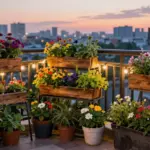
Creating a garden space can be a fulfilling experience, especially when you can personalize it to reflect your style. This is why I’ve put together this guide on hand painted flower pots that look custom—without breaking the bank. We all crave that unique touch in our homes, and what better way to achieve that than through DIY flower pot ideas? Whether you’re a seasoned gardener or just getting started, you’ll find that a little creativity can go a long way in transforming ordinary pots into stunning decor pieces.
If you’re someone who loves gardening but also wants to keep things budget-friendly, you’re in the right place. These ideas are perfect for those who enjoy adding a personal flair to their indoor plant collection. With just a few materials and a bit of time, you can create beautiful, custom flower pot designs that will wow your friends and elevate your indoor space. From geometric patterns to charming farmhouse styles, the possibilities are endless.
In this post, you’ll discover twelve creative ways to paint your flower pots, each bringing its own unique aesthetic. These projects are not only fun but also easy enough for anyone to try, regardless of their artistic skills. So grab your paintbrushes and let’s dive into a world of color and creativity!
Key Takeaways
– Explore Various Styles: Discover twelve different themes for hand painted flower pots, including geometric patterns and whimsical quotes.
– Personalization is Key: Learn how to incorporate personal touches such as monograms and seasonal themes to enhance your pots’ uniqueness.
– Budget-Friendly Projects: Get tips on how to create stunning pot designs without spending a fortune on materials.
– Fun DIY Experience: Enjoy the hands-on aspect of these creative gardening projects that allow you to express your artistic side.
– Transform Your Space: Understand how painted plant pots can elevate your home decor and create a warm, inviting atmosphere.
1. Geometric Patterns

Embrace the allure of geometric patterns to modernize your flower pots! This design principle creates visual interest and encourages a contemporary vibe in any space. Crisp lines and bold angles can transform plain pots into stunning focal points. Colors like teal, orange, or mustard elevate the look, making it vibrant and eye-catching.
To implement this style, use painter’s tape to outline your shapes and then fill in with your chosen colors. For a budget-friendly option, consider spray paint for a smooth finish. This trend is not just stylish; it can evoke feelings of creativity and excitement in your indoor garden.
Consider these tips for a successful geometric design:
– Pair bold colors with matte finishes for a chic look.
– Experiment with various shapes like triangles or stripes.
– Mix colors to create a playful, dynamic pot.
These beautifully painted pots will enhance any plant display, making your gardening experience even more enjoyable.
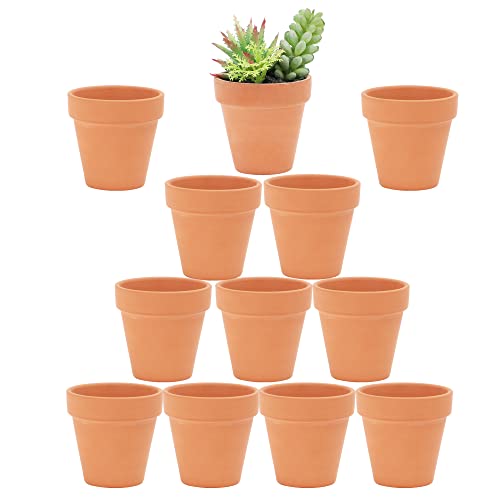
★【TERRACOTTA】Terracotta pots are classic planting pots, with a neutral and warm color that makes almost any plant look great. Terra cotta dries out more quickly than other mediums. Suitable for propagating seedling, collecting succulents and small plants like succulents, cactus, herbs, moss ball, and bring so much positivity.

Handmade Art:This boho plant pots has hand-painted white flower pattern (Tulip, Sunflower,Five - petaled flower) on the surface that scream boho style,The grayish blue and white color and their modern and bohemian esigns provide a tasteful accent of visual interest,perfect for cultivating a cozy and well-considered vibe in any space

Practical Size Combo - Large: 6.3 x 6.3 x 6.5 inches, small: 4.7 x 4.7 x 4.9 inches. Plants not included. Small and medium sized pots are perfect for growing herbs, succulents, small cacti, orchids, snake plants, peppermint, aloe, flowers and other plants. Registration Number: VA0002495190
2. Ombre Effect

The ombre effect is a stunning design technique that smoothly transitions from one hue to another, creating a captivating visual experience. This style works well with complementary colors, allowing you to express your creativity while adding depth to your flower pots. Shades like pink fading into white or blue into teal can transform your indoor garden into a colorful paradise.
To achieve the ombre look, paint from the bottom up, blending colors as you ascend. Use a sponge or brush for a seamless transition. For a budget-friendly touch, consider reusing old pots and enhancing them with this trendy technique.
Try these practical tips for the ombre effect:
– Use a sponge for an even blending finish.
– Tape the rim for clean edges while painting.
– Add decorative stones at the pot’s base for style and drainage.
Ombre pots not only elevate your plant’s presence but also create a harmonious connection with their vibrant surroundings.
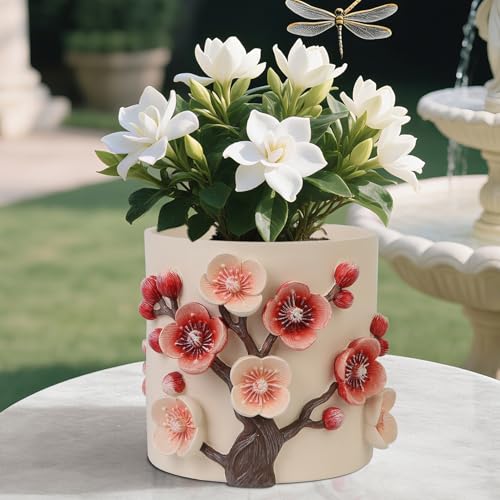
【Unique Design】: Fall in love with our eye-catching boho plant pots featuring bold 3D red-and-white petals cascading across a pristine white base. The playful, lifelike floral design adds whimsy to any space, blending seamlessly with decorative plant pots indoor collections or flower pots outdoor setups for gardens/patios. A true conversation starter for modern bohemian aesthetics!

【Blooming Flowers】You will be obsessed with a 360-degree colorful painting depicting of the cute flowers blooming on the flower plant pots. Once you put your inventive plants of choice in, the eclectic rainbow planter will add whimsy to your plant display.

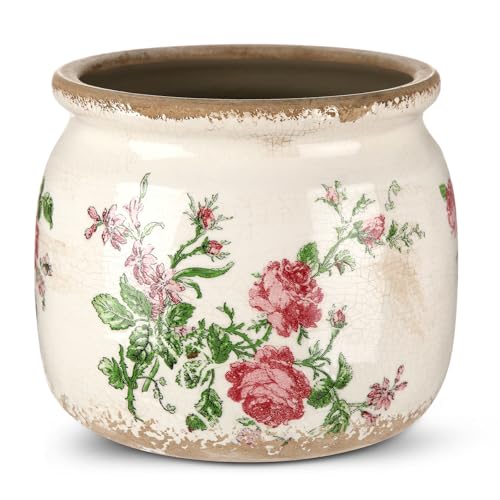
Vintage Flower Pot: you will get 1 beige and blue vintage ceramic planter, which crafted with a distressed rose pattern and crackle glaze finish, adding a rustic farmhouse vibe to both modern and traditional decor styles; Note: plants not included
3. Floral Designs

Unleash your creativity with hand-painted floral designs that celebrate the beauty of nature! Painting simple blooms like daisies or wildflowers directly onto your pots can instantly brighten up your space. Soft pastels evoke delicacy, while bold hues make a striking statement. Begin with a base coat, then carefully add petals and leaves for a personalized touch.
To ensure your designs last, opt for acrylic paint, which is both durable and vibrant. A clear varnish can protect your artwork from water damage. For a sentimental touch, personalize each pot with flowers that hold special meaning for you.
Here are some helpful tips for floral designs:
– Choose acrylic paint for durability.
– Seal with varnish for added protection.
– Personalize pots with meaningful flowers.
These floral pots not only enhance your decor but also serve as a beautiful reminder of the wonders of nature.

Charming Wild Rose Pattern: featuring a beautifully hand painted wild rose design in rich red hues, this vintage ceramic planter brings romantic countryside charm to your home; Each flower motif evokes vintage garden aesthetics, perfect for cottage core lovers

Vintage-Inspired Green Floral Vase: Add timeless beauty to your home with this green and white floral ceramic vase, featuring a subtle crackle glaze and rustic double-handle belly jar shape for authentic vintage charm and faux-bulous floral print elegance.

VINTAGE TUSCAN STYLE DECOR: Inspired by Tuscan countryside aesthetics, this indoor planter adds a touch of rustic elegance to any room. Its vintage, shabby chic finish perfectly complements a variety of home decor styles, from farmhouse to bohemian.
4. Animal Motifs

Infuse your indoor garden with a touch of whimsy by incorporating animal motifs on your flower pots! Whether it’s a playful bunny, a vibrant bird, or a friendly cat, these designs add personality and charm to your space. You can use stencils or freehand your favorite animals, ensuring that each pot stands out in its uniqueness.
Start with a solid color for the base and paint the animal in contrasting shades for a striking appearance. For a fun twist, consider adding googly eyes or other embellishments to make your creations even more delightful. Pairing these pots with themed plants can enhance the overall look.
Explore these creative ideas:
– Create a set of pots featuring a common animal theme.
– Use googly eyes for a playful touch!
– Pair with plants that complement the animal theme.
These animal-themed pots not only brighten your garden but also spark joy and conversation among guests.
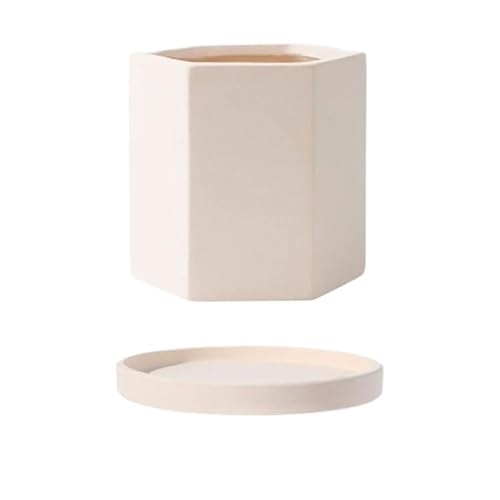
This geometric plane plain-fired ceramic flower pot is made of coarse pottery, serving as a hand-painted clay pot for home planting.
This geometric plane plain-fired ceramic flower pot is made of coarse pottery, serving as a hand-painted clay pot for home planting.
This geometric plane plain-fired ceramic flower pot is made of coarse pottery, serving as a hand-painted clay pot for home planting.
5. Whimsical Quotes

Incorporating whimsical quotes into your flower pots can uplift anyone who encounters them! Choose phrases that resonate with you, from fun gardening sayings to reminders that encourage relaxation and enjoyment. Using a fine brush or paint pen, write your chosen quotes in playful fonts that pop against the pot’s background color.
To protect your messages from water damage, seal the pots after painting. Experimenting with various fonts can add character—cursive for elegance or block letters for a modern feel. Pair these pots with cheerful plants to create a positive atmosphere.
Consider these tips for adding quotes:
– Seal pots to protect your writing.
– Experiment with different font styles.
– Choose plants that match the positive energy of the quotes.
These pots can become daily affirmations, adding a unique and inspiring touch to your gardening space.
Whimsical quotes on hand painted flower pots turn a simple plant into a tiny mood booster. The trick is to choose lines that feel true to you, then let your brush do the talking—budget-friendly charm that greets you every day.

【Artistic Colors & Van Gogh-Inspired Design】Immerse your space in the mesmerizing beauty of Van Gogh-inspired floral and starry night motifs with these decorative plant pots. Each boho plant pot showcases vibrant swirls of deep blues, golden yellows, and dreamy whites, transforming ordinary greenery into a gallery-worthy display. Perfect for flower pots outdoor or indoor settings, these hand-painted masterpieces blend artistic elegance with nature, making them standout cute planters for indoor plants or garden accents.

【Whimsical Picasso-Inspired Artistry】Each abstract flower pot in our U WONDERFUL collection features a hand-painted, asymmetrical face design with vibrant colors, blending playful modern charm and artistic flair. These cool flower pots are unique statement pieces for indoor or outdoor spaces.

Resin Flower Planter: This unique smiling plant pot is a captivating decorative item, with its distinctive face-shaped design and middle fingers up quirky gesture that adds a touch of fun and charm to your room and garden.
How To Choose Hand Painted Flower Pots
Choosing the right hand-painted flower pots can elevate your indoor gardening experience while staying budget-friendly. With so many options available, it’s essential to consider a few key factors to ensure you make the best choice for your space. Here are some helpful tips to guide you through the selection process:
1. Size Matters
When selecting flower pots, size is crucial. You want pots that fit well with the plants you intend to grow. For small indoor plants, choose pots that are around 4 to 6 inches in diameter. Larger plants may need pots that are 10 inches or more across. Remember, a pot that’s too small can stunt plant growth, while one that’s too large can lead to overwatering and root rot.
2. Material Choice
The material of the pot affects both aesthetics and plant health. Ceramic pots are beautiful and retain moisture well, making them perfect for indoor use. Terracotta pots are porous and allow for excellent drainage but can dry out quickly. Consider how each material complements your home decor and the needs of your plants.
3. Design & Style
Hand-painted flower pots come in various designs, from geometric patterns to whimsical quotes. Choose a style that resonates with your personality and home decor. If you prefer a cohesive look, consider picking pots that share color schemes or patterns. However, mixing styles can create a fun, eclectic vibe that showcases your creativity.
4. Drainage Holes
Ensure that the flower pots you choose have proper drainage holes. This feature helps prevent water from pooling at the bottom, which can lead to root rot. If you fall in love with a pot that doesn’t have drainage, you can drill holes yourself. Just be cautious and use the right tools to avoid damaging the pot.
5. Budget Considerations
Stick to your budget while selecting hand-painted flower pots. There are beautiful options available at various price points. Consider DIY options if you’re feeling creative; painting your own flower pots can save money and allow for complete customization. Look for sales or discounts at local garden centers or online retailers to stretch your budget even further.
6. Weight & Mobility
Think about where you’ll place your flower pots and how often you might want to move them. Lightweight materials like plastic are easier to relocate, while heavier options like ceramic may require more effort. If you plan to change your indoor garden’s layout often, consider pots that are easier to handle.
Pro Tip: Always visualize the pots in your space before purchasing. You can use measuring tape to get a better idea of how they will look in your home. This small step can save you time and money in the long run! 🏡💡

Satsuma Design: Meticulously hand-painted with an intricate scene showcasing a samurai's horse and attendents in a vibrant and colorful landscapes. The rich color palette and delicate gold accents celebrate the artistry and heritage of the Far East.

Premium Quality: These terra cotta pots are constructed of high-quality clay, which allows more water and air to circulate freely within the pots while yet maintaining their structural integrity. It's an excellent choice for cactus, succulents, and other plants that thrive in dry soil, and it's also appropriate for areas with lower temperatures. The high air permeability of the pot walls helps the soil to dry out more quickly

Premium Quality: These terra cotta pots are constructed of high-quality clay, which allows more water and air to circulate freely within the pots while yet maintaining their structural integrity. It’s an excellent choice for cactus, succulents, and other plants that thrive in dry soil, and it’s also appropriate for areas with lower temperatures. The high air permeability of the pot walls helps the soil to dry out more quickly
6. Tie-Dye Techniques

Bring the vibrant tie-dye trend to your flower pots for a colorful and lively twist! Using fabric dye or acrylic paint, create swirling patterns that radiate energy. You can dip the pot into a diluted dye solution for a soft wash or apply paint with sponge brushes for more defined, bold patterns. This is a great way to utilize leftover paint and add a funky flair to your pots.
Experimenting with color combinations can lead to exciting results; bright shades like pinks and yellows evoke a summer vibe, while muted tones create a cozy atmosphere. Ensure your pot is sealed to prevent fading over time.
Here are some helpful tips for tie-dye techniques:
– Experiment with color combinations for unique effects.
– Seal pots to maintain color vibrancy.
– Plant flowers that complement the pot’s colors.
These tie-dye pots are perfect for creating a bohemian-inspired indoor garden that radiates fun and creativity.

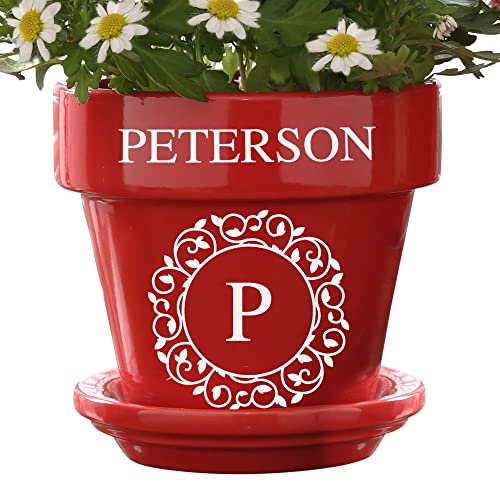
Personalized Touch - Add a personal flair to your garden or home with the ceramic Circle & Vine Monogram Personalized Flower Pot, featuring your initial and family name etched into the design for that bespoke touch.

【CUSTOMIZED】Please click the "CUSTOMIZE NOW" button to choose your favorite color and enter the text, the personalized elegant script that will provide you a everybody jealous gift.
Personalized Touch - Add a personal flair to your garden or home with the ceramic Circle & Vine Monogram Personalized Flower Pot, featuring your initial and family name etched into the design for that bespoke touch.
7. Stenciled Patterns

Stenciling is an easy and effective way to add intricate designs to your flower pots without needing advanced painting skills. You can purchase stencils or make your own from cardstock. Choose lovely patterns like paisley, dots, or lace designs, then lay the stencil on the pot and apply paint with a sponge or brush for a crisp finish.
To avoid bleeding, ensure the stencil is flat against the pot before applying paint. Using contrasting colors will make your design stand out beautifully. Mixing different stencils can create an interesting layered look for your pots.
Check out these handy tips for stenciling:
– Ensure the stencil is flat for clean lines.
– Use contrasting colors for visual impact.
– Combine stencils for a multi-pattern effect.
These stenciled pots will look custom-made and add a unique touch to your gardening decor.
Vintage Flower Pot: you will get 1 beige ceramic planter, which crafted with a distressed scroll shaped and French rose pattern, adding a rustic farmhouse vibe to both modern and traditional decor styles; Note: plants not included

ELEGANT DESIGN: These ceramic planters for indoor plants feature a timeless look that complements any décor, making them perfect flower pots for indoor plants.

ONE WHITE 16 oz. Wide Mouth Mason Jar
8. Rustic Charm

Capture the essence of rustic charm by painting your pots in earthy tones and textures that mimic natural materials. Soft whites, browns, and greens can create a warm, inviting feel. After painting, use a sponge to dab on a darker hue for a weathered effect. Wrapping jute twine around the rim adds an extra touch of rustic appeal.
For an authentic handmade look, choose matte paint. Pair these pots with herbs or plants that thrive in rustic environments, such as lavender or rosemary. Consider giving old pots a fresh look to enhance the vintage vibe.
Here are some useful insights for achieving rustic charm:
– Use matte paint for a natural feel.
– Pair with herbs for a cohesive look.
– Repurpose old pots for added character.
These rustic pots blend beautifully with a natural indoor garden, creating a cozy and inviting atmosphere in your home.
Fun fact: DIY hand painted flower pots can slash decor costs by up to 40% while delivering a custom, rustic look. Use matte paints, earthy tones, and jute twine for instant charm that pairs beautifully with lavender and rosemary.
This geometric plane plain-fired ceramic flower pot is made of coarse pottery, serving as a hand-painted clay pot for home planting.
This geometric plane plain-fired ceramic flower pot is made of coarse pottery, serving as a hand-painted clay pot for home planting.
This geometric plane plain-fired ceramic flower pot is made of coarse pottery, serving as a hand-painted clay pot for home planting.
9. Color Blocking

Color blocking is all about bold hues and sharp contrasts, making it an ideal choice for modern flower pots. Select two or three complementary colors and divide the pot into sections for painting. Use painter’s tape for clean lines or try freehanding for a more artistic approach. This technique allows you to create striking centerpieces in your indoor garden.
Experimenting with glossy versus matte finishes can help you find the look that suits your style best. Pair these pots with plants that have interesting shapes for an eye-catching display. Mixing patterns can also add an extra layer of creativity to your pots.
Explore these effective tips for color blocking:
– Try glossy and matte finishes for variety.
– Combine plants with unique shapes for impact.
– Mix solid colors with patterned sections.
Color-blocked pots can energize any space while leaving a lasting impression on your guests.

Cute Face Planter on Rocking Chair: this head flower pot has a smiley face,looks like a small guy reading on a rocking chair. when you put plants in it, just like this little guy has grown hair. if you flick the rocking chair, it will sway back and forth, how cute is that! Get one for yourslef, or as a gift for your friends and relatives!

【Mushroom Forest】You will be obsessed with a 360-degree colorful painting depicting of the cute mushroom on the flower plant pots. Once you put your inventive plants of choice in, the eclectic rainbow planter will add whimsy to your plant display.

Starry Night Inspired Planter: Bring the magic of Starry Night into your home with this resin flower pot. The swirling blue sky, radiant sunflower, and vivid floral details transform a simple planter into an art-inspired statement piece
10. Seasonal Themes

Celebrate the seasons by creating themed flower pots that reflect the beauty of nature throughout the year! For spring, choose bright colors or floral designs; for autumn, incorporate rich oranges and browns, perhaps with leaf motifs. Changing your pots with each season keeps your indoor garden fresh and engaging.
Consider adding removable decorations like twine or small seasonal ornaments for an easy transformation. Chalk paint is excellent for this, as it allows for simple customization; just repaint as the seasons change. Create a mini garden that features seasonal plants for a vibrant display.
Try these ideas for seasonal themes:
– Add removable decorations for easy changes.
– Use chalk paint for quick updates.
– Create a mini garden that swaps with the seasons.
These themed pots ensure your gardening remains exciting and in tune with nature all year long.
11. Personalization with Monograms

For a truly unique touch, consider adding monograms or initials to your flower pots. This simple yet meaningful detail personalizes any pot, making it feel special and tailored just for you. Choose a bold font for the initials and paint them in a contrasting color to make them stand out. Adding a decorative border or small designs can enhance the overall look.
Using a stencil can ensure perfect letters, while freehanding offers an artsy vibe. Select pots that reflect your style, whether rustic or modern, and consider gifting personalized pots with the recipient’s initials for a thoughtful present.
Here are some practical tips for personalization:
– Use stencils for clean lettering or freehand for creativity.
– Choose pots that suit your style.
– Consider gifting personalized pots for a unique touch.
Personalized pots elevate your indoor decor while adding a sentimental value to your gardening experience.
12. Farmhouse Style

The farmhouse style embodies simplicity and warmth, making it perfect for cozy indoor spaces. Paint your pots in classic colors like white or soft gray, then add charming details such as faux distressed finishes or simple lines. You can even stencil small hearts or stars to accentuate the design.
Using chalk paint helps achieve an authentically rustic look. Pair these pots with plants like ferns or peace lilies for a timeless appearance. Incorporating wooden elements, such as plant stands, can further enhance the farmhouse vibe.
Consider these tips for achieving a farmhouse style:
– Choose chalk paint for a rustic touch.
– Pair with classic plants for a charming look.
– Incorporate wooden elements for added warmth.
These farmhouse-style pots can transform your indoor garden into a serene retreat, perfect for unwinding after a busy day.
Farmhouse style proves that cozy, budget-friendly decor is within reach. With hand painted flower pots in chalk paint, you can add faux distress and simple lines, then pair them with ferns for a warm, timeless vibe.
Conclusion

Hand-painted flower pots are not just about aesthetics; they are a reflection of your style and creativity.
By using these budget-friendly ideas, you can easily transform your indoor gardening decor into something truly special. Whether you prefer whimsical designs, rustic charm, or modern geometric patterns, there’s a technique here for everyone. Dive into these creative gardening projects and bring your indoor plants to life with a personal touch!
Frequently Asked Questions
What are the simplest ways to create hand painted flower pots on a budget?
Kick off with thrifted pots or repurposed containers to cut costs. Try DIY flower pot ideas like painting a single color and adding a border, or stenciling floral outlines. Use acrylic craft paints, affordable and easy to layer. Seal with a clear matte sealer to protect the design, especially for painted plant pots that sit in bright light or humidity. For budget-friendly gardening, pick complementary colors and group several pots for a cohesive, high-end look that screams custom without paying a pro. Steps: clean pot, base coat, add design, dry, seal. Hand painted flower pots that look custom on a budget are totally doable.
How can I customize DIY flower pot ideas to fit my indoor plant decor?
Start by choosing a color palette that matches your room and pick a theme—botanical, geometric, or playful patterns. Use masking tape for clean lines, stamps or stencils for repeated motifs, or decoupage napkins for texture. Try combining a few complementary designs across several pots to create a cohesive display. With thoughtful planning, you’ll achieve custom flower pot designs and painted plant pots that feel made for your space.
What paints and sealants should I use for durable painted plant pots indoors?
Opt for water-based acrylic craft paints for easy cleanup and good coverage. Choose non-toxic, low-odor formulas if your indoor garden is in a living space. Seal with a clear indoor sealer or polyurethane to protect the artwork from moisture and soil, applying 2–3 coats for durability. For porous pots like terracotta, consider a light primer or glaze and a liner to prevent moisture from seeping into the painted surface. This keeps hand painted flower pots and painted plant pots looking fresh longer.
How can I achieve a custom look without professional tools or a big budget?
You don’t need fancy tools to get a custom vibe. Use simple techniques: painter’s tape for crisp lines, reusable stencils, and a steady hand for freehand details. Try color-washing, layering, or ombre effects, and add texture with sponge dabs or dry brushing. Decorate with decoupage elements or pressed botanicals for extra depth. This approach is budget-friendly gardening that yields custom flower pot designs and suits any creative gardening projects.
How do I care for and maintain hand painted flower pots to keep them looking fresh?
Wipe dust with a soft cloth and avoid soaking pots in water to protect the paint. If soil touches the rim, wipe it promptly. Re-seal faded or chipped areas seasonally to maintain the finish and keep your hand painted flower pots looking sharp. Consider using a liner or drainage tray to minimize moisture exposure to the painted surface. With simple care, your painted plant pots remain vibrant as part of your creative gardening projects.
Related Topics
hand painted flower pots
DIY flower pot ideas
budget-friendly gardening
custom flower pot designs
painted plant pots
creative gardening projects
easy DIY
beginner friendly
home decor
indoor gardening
seasonal decor
artistic gardening